변수(Variable) 정의와 변수 선언
변수란 어떤한 값을 담는 '상자'라고 생각하면 된다. 예를 들어 'Coupang'이란 단어(변수명)을 가진 상자(변수)가 있다고 가정한다. 상자를 보고 글만 읽는 다면, 당연히 상자 내부에 어떤 물건(String
hong-study.tistory.com
회원가입 폼 만들기
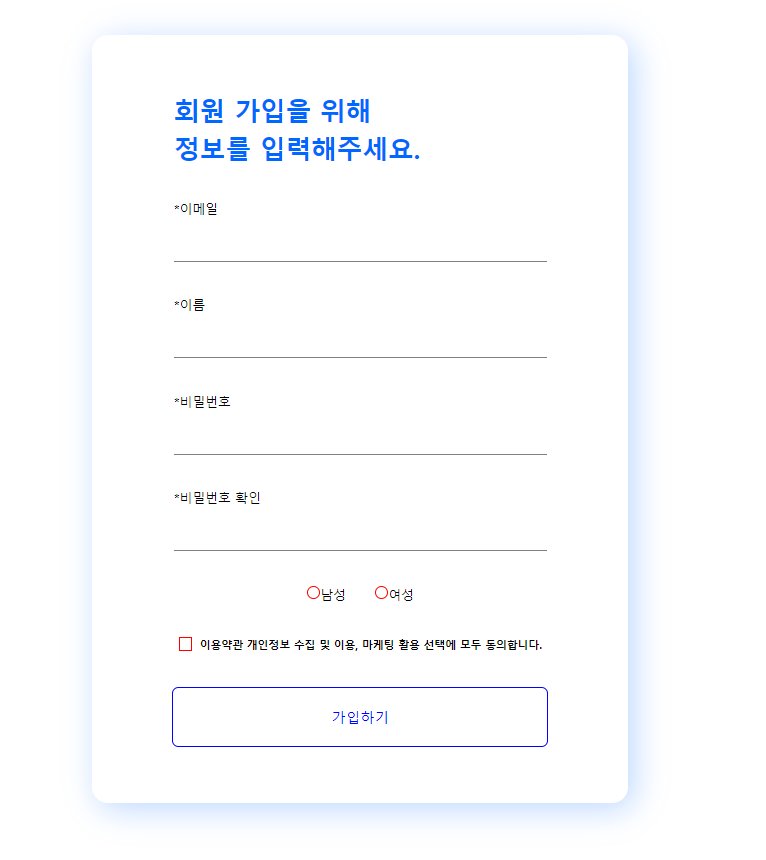
인프런의 프리캠프라는 강의를 통해서 제공받은 Figma를 이용하여, 회원가입 폼을 구현해봤습니다.

- 해당 폼을 구현하기 위해 아래 소스코드와 같이 div 로 구역을 구분해주었습니다.
<HTML>
<!DOCTYPE html>
<html lang="ko">
<head>
    <meta charset="UTF-8">
    <meta name="viewport" content="width=device-width, initial-scale=1.0">
    <title>회원가입</title>
    <link href="./signup.css" rel="stylesheet">
</head>
<body>
    <div class="background">
        <div class="outer__box">
            <div class="wrapper">
                <div class="wrapper__head">회원 가입을 위해<br> 정보를 입력해주세요.</div>
                <div class="wrapper__email">
                    <label id="input__label" for="email__input">*이메일</label>
                    <input class="email__input" type="text">
                </div>
                <div class="wrapper__name">
                    <label id="input__label" for="email__input">*이름</label>
                    <input class="email__input" type="text">
                </div>
                <div class="wrapper__password">
                    <label id="input__label" for="email__input">*비밀번호</label>
                    <input class="email__input" type="text">
                </div>
                <div class="wrapper__password__check">
                    <label id="input__label" for="email__input">*비밀번호 확인</label>
                    <input class="email__input" type="text">
                </div>
                <div class="wrapper__gender">
                    <div class="gender__radio">
                        <input type="radio" name="gender">남성
                    </div>
                    <div class="gender__radio">
                    <input type="radio" name="gender">여성
                    </div>
                </div>
                <div class="wrapper__agree">
                    <input type="checkbox">이용약관 개인정보 수집 및 이용, 마케팅 활용 선택에 모두 동의합니다.
                </div>
                <div class="wrapper__join">
                    <button class="join__button">가입하기</button>
                </div>
            </div>
        </div>
    </div>
</body>
</html>
해당 예제를 보시면 흰색 배경안에 각 각의 요소(element)들이 자리잡고 있는 게 눈으로 보입니다.
가장 밖 : background
전체 회원가입 폼 : outer__box
요소들을 감싸는 폼 : wrapper
머릿 말 : wrapper__head
이메일 : wrapper__email
이름 : wrapper__name
비밀번호 : wrapper__password
비밀번호 확인 : wrapper__password__check
성별 : wrapper__gender
동의 : wrapper__agree
가입 버튼 : wrapper__join
이렇게 크게 구분하여 구역을 나눠주었습니다.
그냥 무지성을 하기에는 시간이 너무오래걸리기도 하여 해당 화면을 캡쳐한 후
powerpoint 를 이용해 상자를 만들고 구역을 나눠주니 위 처럼 쉽게 구분할 수 있었습니다.
CSS
*{
    box-sizing: border-box;
}

.background{
    display: flex;
    flex-direction: column;
    align-items: center;
    justify-content: center;
    width: 1920px;
    height: 1080px;
    background-color: #ffffff;

}

.outer__box{
    display: flex;
    flex-direction: column;
    justify-content: center;
    align-items: center;
    width: 670px;
    height: 960px;
    border: 1px solid #AACDFF;
    box-shadow: 7px 7px 39px 0px #0068FF40;
    border-radius: 20px;
    border: 1px;
}

.wrapper{
    display: flex;
    flex-direction: column;
    align-items: center;
    justify-content: space-between;
    width: 470px;
    height: 818px;
}

.wrapper__head{
    width: 466px;
    height: 94px;
    font-size: 32px;
    font-weight: 700;
    line-height: 47.36px;
    color: #0068ff;
}

.wrapper__email{
    display: flex;
    flex-direction: column;
    width : 466px;
    height: 80px;
}

.wrapper__name{
    display: flex;
    flex-direction: column;
    width : 466px;
    height: 80px;
}

.wrapper__password{
    display: flex;
    flex-direction: column;
    width : 466px;
    height: 80px;
}

.wrapper__password__check{
    display: flex;
    flex-direction: column;
    width : 466px;
    height: 80px;
}

.email__input{
    width: 466px;
    height: 56px;
    border-width: 0px;
    border-bottom: 1px solid gray;
}

.email__input:focus{
    outline: none;
    border-bottom: 1px solid #0068FF;
}

.wrapper__gender{
    display: flex;
    flex-direction: row;
    width: 140px;
    height: 24px;
    justify-content: space-between;
}

.gender__radio{
    display: flex;
    flex-direction: row;
    width: 55px;
    height: 24px;
    font-size: 16px;
    font-weight: 400;
    justify-content: center;
}

[type="radio"]{
    appearance: none;
    border: 1px solid red;
    border-radius: 50%;
    width: 1.25em;
    height: 1.25em;
    margin:0 0 2px;
    padding:0;
    vertical-align:middle;
}

[type="radio"]:not :checked{
    border-color: gray;
}

[type="radio"]:checked {
    border: 0.4em solid tomato;
}

.wrapper__agree{
    display: flex;
    flex-direction: row;
    width: 454px;
    height: 21px;
    font-size: 13.5px;
    font-weight: 700;
    line-height: 20.7px;
    justify-content: space-between;
}

[type="checkbox"]{
    appearance: none;
    border: 1px solid red;
    width: 1.25em;
    height: 1.25em;
    margin:0 0 2px;
    padding:0;
    vertical-align:middle;
}

[type="checkbox"]:not :checked{
    border-color: red;
}

[type="checkbox"]:checked {
    border: 0.4em solid tomato;
}

.wrapper__join{
    width: 470px;
    height: 75px;
}

.join__button{
    width: 470px;
    height: 75px;
    border: 1px solid blue;
    background-color: #ffffff;
    border-radius: 8px;
    font-size: 18px;
    font-weight: 500;
    color: blue;
}

.join__button:hover{
    width: 470px;
    height: 75px;
    border: 1px solid #ffffff;
    background-color: #AACDFF;
    border-radius: 8px;
    font-size: 18px;
    font-weight: 500;
    color: #ffffff;
}

.join__button:focus{
    width: 470px;
    height: 75px;
    border: 1px solid #ffffff;
    background-color: blue;
    border-radius: 8px;
    font-size: 18px;
    font-weight: 500;
    color: #ffffff;
}
각각의 구역들을 CSS로 정리한 소스코드입니다.
구현 화면

너무 동일하게 하면, 공부한 티가 나지 않을까하여, ratio 부분과 체크박스 클릭시
색상을 변경하였습니다.
<출처 : 인프런 프리캠프>
728x90
'WEB > HTML' 카테고리의 다른 글
| [HTML/CSS] HTML 태그 (0) | 2024.02.29 |
|---|---|
| [HTML/CSS] HTTP 통신과 웹 (0) | 2024.02.27 |
| 간단한 시간표만들기 [ 표 ] (0) | 2020.04.11 |
| WEB Browser 란 (0) | 2020.03.18 |
| HTML 이란? (0) | 2020.03.18 |


